


I love saving money. I also love building stuff myself. When I get the opportunity to do both, I try to take advantage. I got married last year and we decided to serve home brew at the reception. Of course, I was not going to serve beverages that I have such pride in without providing a bit of show as well. I built a keezer and tap wall to serve as a Beer Garden.
I enlisted some help from my dad. We used a variety of parts that we either had laying around plus a few trips to the local hardware store to acquire the rest.
Supplies
- 1x8s
- 2x6s
- scrap plywood
- hinges and gate latches
- tie plates
- wood screws and machine screws
- finishing nails
- shelf brackets
- old chest freezer
- reflectix
- gorilla tape
- silicone sealant
First, we framed up the tap wall with 2x6s. This would attach to the keezer.
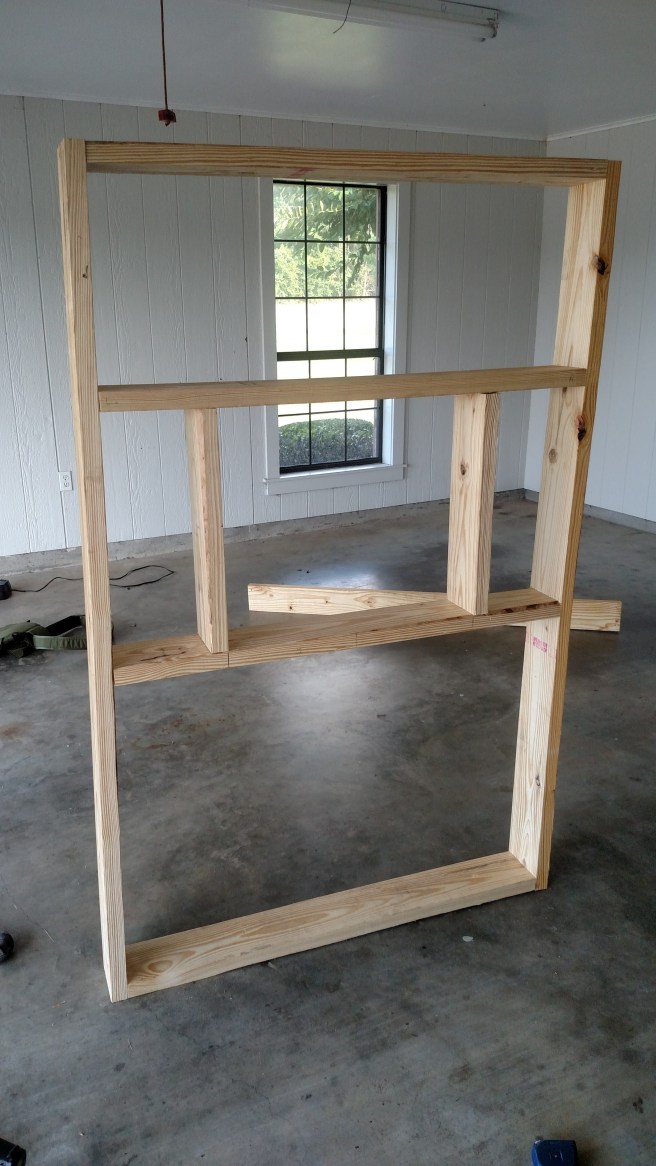
Next, we made a collar for the freezer, so that we would be able to leave the freezer itself intact. The collar allowed us to run beer lines out of the freezer and into the tap wall. We framed up a rectangle with 2x6s. We decided to also use tie plates on the sides and back of the collar to keep everything in place.


Next, we attached the 1x8s to the tap wall frame. We used the finishing nails for this. We chose to not worry with evening the tops to give it a more rustic feel. Next, we attached another 1×8 running perpendicular to the verticals to put the taps on. We popped three holes with a 1″ drill bit to allow mounting of the tap faucets. Finally, we mounted shelving brackets and a bar top to complete the look.


Now it was time to build the chamber for the tap lines. First I used silcone sealant for the cracks in the 1x8s. Next, I lined the interior of the tap box with reflectix insulation. The gorilla tape helped to seal the edges as well. We ripped some 1x8s to mount the gate latches on, as well as provide a bottom for plyboard access panel to contact. I robbed a piece of plyboard from an old homemade boat hunting box is the reason it is camo painted. The front of the collar would rest against the gap at the bottom. We cut a slit in this portion of the collar to allow the tap lines into. As well as the tap lines, I mounted a couple of pc cooling fans to move air between the keezer and the chamber behind the tap wall.


Now it was time to stain the wall. We chose to use a darker stain on the shelf and tap board.


Finally, I decided to go with a removable sign, to allow versatility if I chose to use the tap wall for other occasions. Pictured below is the sign as well as the finished product. We used eye hooks on each side of the tap wall frame to attach a ratchet strap too. We used this to cinch the tap wall to the keezer. (Not pictured are all the inner workings) I removed the hinges from the freezer top. This would allow me access to the kegs and CO2 tank without having to worry about which way the freezer was turned. Faucet connection is simple enough and I will not cover in this post. Some sheets of burlap material covered the freezer well enough behind the tap wall. The freezer was big enough to fit a 1/2 bbl keg of a white ale blend and two cornies each of a blonde ale and saison. As wedding favors we gave custom printed shaker pints at the top of the article.


The wife and I posing with my folks on wedding day.

